Dense coconut butter without extracting cream
Like most people who adopted a vegan lifestyle later in life, I too had my apprehensions. I am not a glutton but being a Palakkad Iyer (a community that uses milk and curd in generous measures), a good eater and having cultivated love for good food thanks to a Mother who herself is quite a gourmet cook, I wondered whether I would be able to survive without milk or milk products. It was quite easy turning 'eggless' which I did three years before I turned vegan because even otherwise egg was something I had adopted after marriage and it is still a banned item in my maternal home.
Another thing that nagged me was whether I would be able to do justice to the three other people in our family (P, Jr.P and Jr.H). They were used to getting desserts, cakes and paneer (cottage cheese) at home at least twice a week and here I was walking the vegan march! It took many failures before I could get the hang of perfect vegan cakes. Eggs in cakes are very forgiving and even if you beat more than the recipe demands you still have a good texture and taste. Eggless was OK too, milk and cream make up for lack of egg. But with vegan cakes one has to be careful about 'how much' and 'how long' the batter needs to be beat. Too much will make it dense, too less will make it powdery.
Like I said earlier, I am a good eater. I persisted and practised often - at least twice a week - to make sure I did not miss out on cakes, breads, desserts or drinks! P was amused and the children? Well, they were pleased as 'vegan punch'!
In the beginning I stuck to flax seeds to replace eggs and then I turned to soy milk. I was not happy with both the alternatives as I could not successfully preserve them when made at home. Towards the end of last year I warily tried using coconut oil to bake and felt great. Coconut oil has more fat than the other oil which helps in giving a good texture, it does not leave a smell and is always available in my kitchen (South Indians cannot do without coconut oil!).
I mustered courage and tried using canned coconut milk and coconut cream in baking and found my Mecca but I wasn't happy using store bought products. I like making things from scratch so it was natural to make these things at home. Ok! It is also because it is P who buys, grates and extracts coconut milk:D.
Homemade coconut milk and cream are far better than store brought. The pictures are proof. It takes all my will power to stop myself from slurping them up.
When I posted a picture of the coconut butter in facebook, Manish Jain, requested me to post it in the group, "Indian Vegan". I thought it would be a better idea to just post it here because I want it to be available to others as well. Had it not been for that nudge, I might not have made this a post at all, simply because it did not occur to me that it qualifies to be posted!!
Hope you enjoy the benefits of this preparation as much as we do.
Pssst... - Try getting someone to do the grating and the pressing! It helps IMMENSELY.
Recipe: Making Raw Vegan Home made Coconut Cream and Coconut Butter
Time: P says it takes about 30 minutes which includes grating and pressing.
Yield: One medium sized coconut will yield thick coconut cream - 3/4 cup and milk - 2 cups
Ingredients:
Coconut that is mature (heavy, meaty coconut) - 1, grated
Tap water - 2 cups
Tools:
A grater
Cheese cloth or soup strainer
Method:
Grate the coconut discarding the brown inner layer. The yield will be approximately 4 cups, loosely packed.
For the cream, gather the gratings and crushing with your fingers, like how you knead dough. The milk will start oozing. Now express the thick milk without adding any water, one fistful at a time into other cup. Refrigerate the milk for at least four hours. The product you get will be thick and creamy and the bonus is that it will taste like heaven!
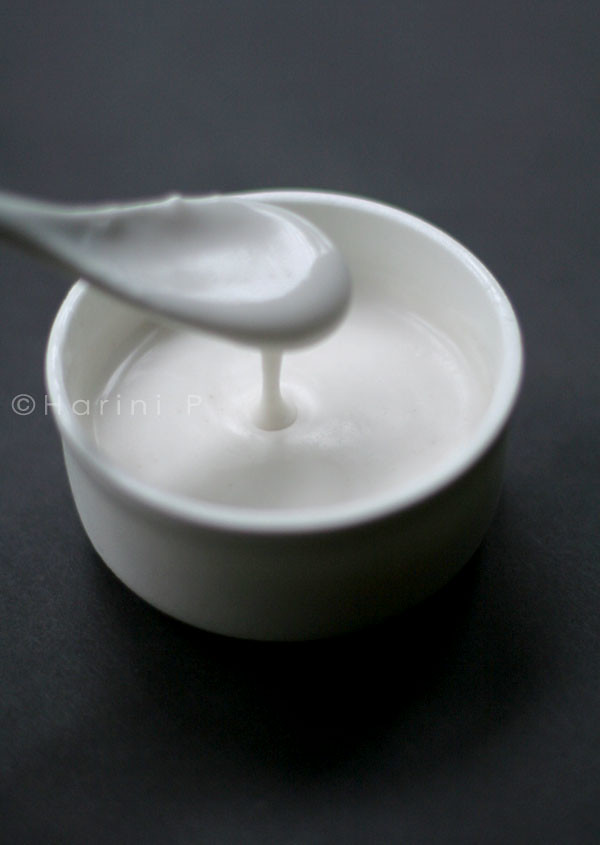
Thick coconut cream
To the residue that is left, add a cup of tap water or warm water, if you like, and repeat the same procedure. The milk so expressed will be thinner. Do not mix it with the milk that was expressed without water. Repeat with another cup of water. The second and third extract can be mixed. Refrigerate for two days so that fat rises to the top and hardens. Two days is needed to harden the fat. This forms the butter.
Coconut butter yielded after separating cream
Note:
If you add water, the milk will not yield cream. The cream can be used in the same way as milk cream and will yield the same results.
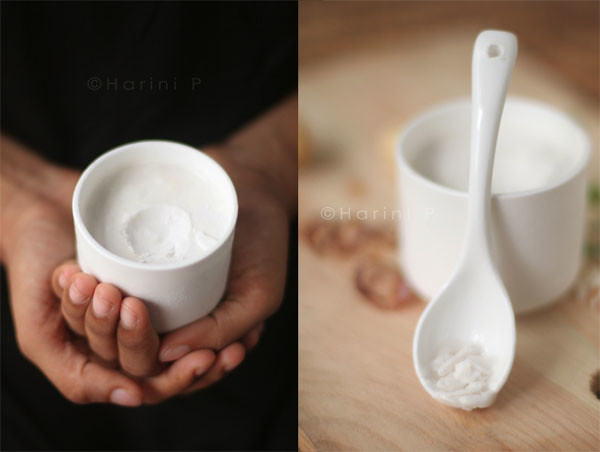
If you do not want cream skip the first step and proceed for the second extract directly but with only one cup of water. The butter will be richer (See the first picture).
The butter (rich one as well the other) is great for baking but is not the same as butter from milk. It will not be good for puff pastries though it works well for cookies and cakes.
I use the second extract in making soups, apart from traditional Indian and Thai dishes. It yields a mild sweetness and lovely flavour to any soup when used in combination with stock.
I will share the recipe for the cold fruit soup I made with this in my next post.
If you like this post, found it useful or would like to give some constructive suggestions please leave your views in the form of a comment. Keeps me happy to know there is a human mind that appreciates the time taken for blogging and taking pictures.
Caution:
Do not freeze the cream!
This post goes to Jaya Wagle of Desi Soccer Mom for her event "Back to basics"Labels: Basics for a vegan kitchen, Coconut, Coconut cream and coconut butter, Home made Coconut Butter, Home made Coconut Cream, Homemade vegan butter, Sunshinemom, Tongue ticklers, Vegan butter